Calibration parameters include calibrated points, input range settings, tare and zero values. These may be burned to the module's EEPROM using the Save Calibration command. Before you can begin to implement a Loadcell application, you must calibrate at least two points, although up to 12 points may be calibrated; all other calibration parameters are optional. However, note that if the application requires you to set Input Range/Gain, you must make these settings before you calibrate points. Setting the Input Range/Gain after calibrating points invalidates these points.
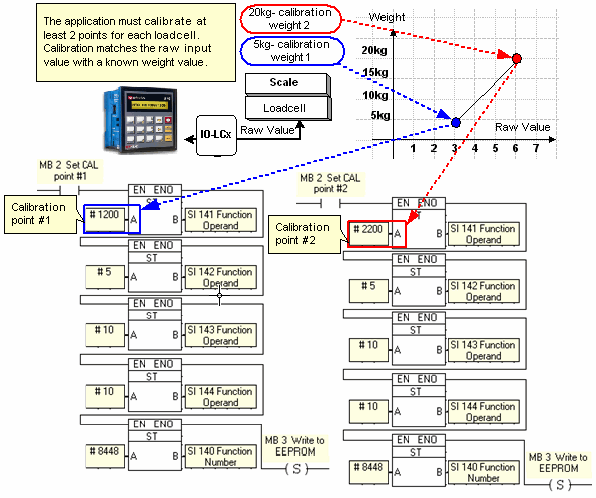
A Calibration Point matches a Raw Value with a Weight value. These points are used to linearize the input value.
To calibrate points, connect the controller to the loadcell via the I/O-LCx. Initial calibration is generally performed with known weights as shown in the following figure. After calibration has been performed, advanced calibration enables points to be added or edited via the ladder without weight being physically placed on the loadcell.
|
Notes ♦ |
If the application requires you to set Input Range/Gain, you must make these settings before you calibrate points. Setting the Input Range/Gain after calibrating points invalidates the calibrated points. |
|
♦ |
Zero does not have to be calibrated. |
|
♦ |
Points do not have to be calibrated in any particular order. |
|
♦ |
All calibrated points must be separated by a raw value minimum of 256 (100 Hex). |
|
♦ |
Calibration is an immediate operation; motion is not checked before the operation is carried out. |
|
♦ |
Calibration should be performed with greater accuracy than is required by the application. For example, in an application that requires 100g accuracy, calibrate in units of 10g, then round off the represented value by 10. |
|
♦ |
The highest Calibrated Point weight value should 80–100% of the scale capacity. |
|
♦ |
Calibration cannot be performed if the selected representation mode is uV/V. |
|
♦ |
During calibration, increase filter depth by: - Disabling other Loadcells. |
Matches a Raw Value with a Weight value. These points are used to linearize the input value.
Store the following parameters before storing the command number into SI 140.
Command parameters
|
SI 141 |
Determines the number of a calibration point, the Loadcell to be calibrated, and the DIN rail location of the module. Four digits are stored in SI 141.
|
||||||||||
|
SI 142 |
MI address; this MI will contain the Command Status indication |
||||||||||
|
SI 143 |
Determines the source of the weight value. If you have set your Hardware Configuration to High Resolution, use 2 registers to provide the weight value.
|
||||||||||
|
SI 144, SI 145 |
These two SIs provide the weight to be calibrated, either the weight value or the location of the MI containing the weight value.
|
||||||||||
|
SI 140 |
Command number:8448 |
||||||||||
Enables you to write new Raw Value and Weight values for a calibrated point.
Command parameters
|
SI 141 |
Determines the number and location of the point to be edited.
|
||||||||||
|
SI 142 |
MI address; this MI will contain the Command Status indication |
||||||||||
|
SI 143 |
Determines the location of the Raw and Weight values written to the Loadcell.
|
||||||||||
|
SI 144 SI 145 |
These two SIs provide either the Raw and Weight values or the location of the MIs containing the weight value, that is written to the Loadcell.
|
||||||||||
|
SI 140 |
Command number:8449 |
||||||||||
Use this function to read the current raw and weight values of a Calibration Point from the Loadcell and write them into PLC registers.
|
Notes ♦ |
If the point being read is not in use, both returned values will be -32768 (0x8000) for integer and -8388608 (0x800000) for long. |
Command parameters
|
SI 141 |
Determines the number and location of the point to be read.
|
||||||||
|
SI 142 |
MI address; this MI will contain the Command Status indication |
||||||||
|
SI 146 SI 147 |
Determines the number of MIs that will hold the data read from the Loadcell.
|
||||||||
|
SI 140 |
Command number: 8705 |
||||||||
Use this function to delete a Calibration Point from the Loadcell.
|
Notes ♦ |
The loadcell will stop functioning if deleting a point causes the number of Calibration Points to be less than 2. |
Command parameters
|
SI 141 |
Determines the number and location of the point to delete.
|
||||||||
|
SI 142 |
MI address; this MI will contain the Command Status indication |
||||||||
|
SI 140 |
Command number: 8193 |
||||||||
When you save the calibration, calibrated points, tare, zero, and input range are burned into the module's EEPROM memory. This protects the calibration in the event of a power outage, reset, or power-up. When you calibrate the Loadcell, save each point after it is calibrated.
To preserve any changes made to calibrated points, input range settings, tare and zero values, use Save Calibration any time these parameters are edited.
Command parameters
|
SI 141 |
Determines the number and location of the point to be saved. Save Each point must be saved after it is calibrated.
|
||||||
|
SI 142 |
MI address; this MI will contain the Command Status indication |
||||||
|
SI 140 |
Command number: 9219 |
||||||
This deletes a specific Loadcell's calibrated points, tare, zero, and input ranges from the module's memory. However, Clear Calibration does not erase the values from the EEPROM. They may be retrieved from the EEPROM by resetting the controller.
To delete all values from the EEPROM, run Clear Calibration followed by Save Calibration. Clear Calibration and Save Calibration use the same command number; the difference is the value stored into parameter SI 141.
Command parameters
|
SI 141 |
Determines the location of the Loadcell calibration to be cleared. Clear
|
||||||||
|
SI 142 |
MI address; this MI will contain the Command Status indication |
||||||||
|
SI 140 |
Command number: 9219 |
||||||||
Disable All Other Loadcells disables all loadcells in the expansion module except for the loadcell selected in the command.
During Calibration, the Disable All Other Loadcells command can be used to increase filter depth for a specified settling time by eliminating the delay caused by channel change (approx. 300ms) and thus ensuring faster and more accurate calibration.
To prevent channel changing from wasting settling time, use this function to disable all other loadcells except for the one you are currently calibrating.
Enable All Other Loadcells re-enables all loadcells in the expansion module.
|
Notes ♦ |
After this command runs, and the Command Status Messages MI linked to the selected Loadcell Configuration indicates 1, updated values for all of the enabled channels are already available at their linked operands. This indication can be used to trigger a process, such as calibration. |
|
♦ |
Disabled Loadcells: the Hardware Status Messages MI linked to the selected Loadcell Configuration The status bit "Value not valid" will rise in the disabled load cells' Status Message MI. |
Enable and Disable use the same command number; the difference is the value stored into parameter SI 141
Command parameters
|
SI 141 |
Determines the number and location of the loadcell that will not be disabled. Disable all other Loadcells
Enable all Loadcells
|
||||||||||||||
|
SI 142 |
MI address; this MI will contain the Command Status indication |
||||||||||||||
|
SI 140 |
Command number: 9228 |
||||||||||||||