Advanced Loadcell Functions
Each digital output located on the I/O module is associated with a setpoint. The I/O module itself controls the setpoint function of the outputs. The module turns the outputs ON and OFF when the current loadcell input value reaches setpoint. Setpoint activity is therefore not linked to the program scan. Each output may be assigned a setpoint.
Since the function is based in the firmware of the expansion module, when the output's status changes as a result of reaching/departing from setpoint, the status change is not registered by the Ladder application. To monitor the outputs' status, the Hardware Status Messages MI provides a bitmap indicating status messages; Bit 6 is related to Output 0, Bit 7 to Output 1.
Therefore, use Bits 6 & 7 of the LC Hardware Status Messages MI to monitor the outputs' status, from within the Ladder application.
|
Note ♦
|
Once the Setpoint is activated, it cannot be changed by setting the output via the Ladder application.
|
|
|
The setpoint remains OFF, regardless of its N.O./N.C.setting, when the loadcell input value is:
- invalid (i.e., powered off, LC disabled, out of range, loadcell not calibrated.
- In uV/V mode.
|
Examples
-
When setpoint output 1 is assigned to load cell channel 0, Bit 7 of load cell 0 status will indicate the state of output 1.
-
When setpoint output 0 is assigned to load cell channel 2, Bit 6 of load cell 2 status will indicate the state of output 0.
|
Bit
|
Description
|
Turns ON when:
|
Turns OFF when:
|
|
6
|
Setpoint Status, Output 0
|
Output 0 is ON
|
Output 0 is OFF
|
|
7
|
Setpoint Status, Output 1
|
Output 1 is ON
|
Output 1 OFF
|
Set and Activate Setpoint, Command #8454
Use this command to implement a desired setpoint.
Command parameters
|
|
|
|
|
Set the input value mode for the setpoint:
-
0 - Net
-
1 - Gross
-
2 - Net Min
-
3 - Net Max
|
|
|
Select output:
|
|
|
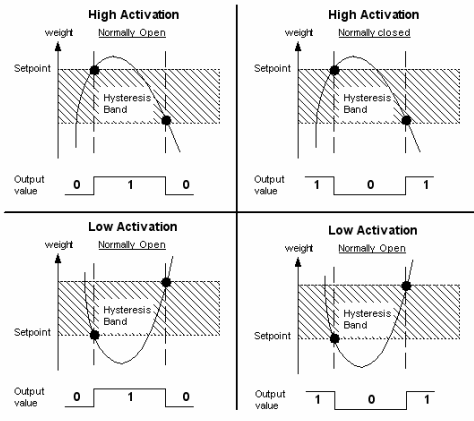
Select setpoint type:
0 - Normal state: Open Activation: Low
1 - Normal state: Open Activation: High
2 - Normal state: Closed Activation: Low
3 - Normal state: Closed Activation: High
|
|
|
The actual value assigned to the setpoint.
|
|
|
Sets a band in which the output will not chatter due to overshoot or vibrations.
|
Command Parameters
|
SI 141
|
Determines the Output number, the LC Value Mode, and the DIN rail location of the module. Five digits are stored in SI 141.
|
Output number
|
LC Value Mode
|
LC #
|
DIN Location
|
|
|
-
0 - Net
-
1 - Gross
-
2 - Net Min
-
3 - Net Max
|
0-2
|
Always 0
|
0-7
|
-
Storing the number 11203 will apply Setpoint to output 1, using Gross, on Loadcell 2, module 4 on the DIN rail.
|
|
SI 142
|
MI address; this MI will contain the Command Status indication.
|
|
SI 143
|
Use SI 143 to apply Setpoint Type, Setpoint Value, and Hysteresis.
SI 144 provides the start address for the vector of MIs the values that are used to apply Setpoint.
|
If the value of SI 143 is:
|
Result
|
|
30
|
The value in SI 144 provides the start address of an MI vector that is 3 MIs long; providing the respective values for Setpoint Type, Setpoint Value and Setpoint Hysteresis.
|
|
60
|
(High Resolution) The value in SI 144 provides the start address of an MI vector that is 6 MIs long, providing 2 MIs for each value.
|
|
|
SI 140
|
Command number:#8454
|
Deactivate Setpoint, Command #8198
Use this to suspend the activity of a particular setpoint.
|
Note ♦
|
Once the Setpoint is deactivated, the output may be controlled via the Ladder application.
|
Command parameters
|
SI 141
|
Determines the Output number, the LC Value Mode, and the DIN rail location of the module. Four digits are stored in SI 141.
|
Output number
|
Reserved
|
LC #
|
DIN Location
|
|
|
Always 0
|
0-2
|
Always 0
|
0-7
|
|
|
SI 142
|
MI address; this MI will contain the Command Status indication
|
|
SI 140
|
Command number:#8198
|
During hardware configuration, under Number of Values, you select whether to use one or two values. When you select a register for the Address: Value(s) parameter, selecting two values means that the register immediately following the register you select is used for the second value. The default representation mode for the first register is Net Weight, and Gross Weight for the second register.
By writing the desired mode number to the Loadcell, you can 'read' the value as:
|
Note ♦
|
When, after Change Representation Mode runs, the LC Command Status Messages MI returns '1', the requested value is already in its linked operand. This means that you can use the '1' status to trigger a process which relies on this specific representation value.
|
|
♦
|
The uV/V representation mode uses the default calibration. Therefore:
-
The uV/V rep. mode indicates the actual applied differential input voltage in micro-volts per every volt of the excitation, regardless of the user-selected input range and DAC (offset) compensation.
-
Setting one of the values representation modes to uV/V will force both values to be represented in uV/V (the rep. mode of the other value will not be overwritten).
-
It takes approximately 330msec to change between uV/V and other different representation modes.
|
|
♦
|
The A/D raw value is affected by the user-selected input range (gain and DAC (offset) compensation). To cancel this effect, use the Clear Calibration command to set default calibration. To return to the last saved calibration, reset the controller (no need to re-power-up neither the unit nor the controller).
|
Command Parameters
|
SI 141
|
Determines to which value the command is applied, the Loadcell number, and the DIN rail location of the module. Four digits are stored in SI 141.
|
Which Value
|
LC #
|
DIN Location
|
|
0=1st Value
1=2nd Value
|
0-2
|
Always 0
|
0-7
|
|
|
SI 142
|
MI address; this MI will contain the Command Status indication
|
|
SI 143
|
Determines the source of the representation mode value.
|
Take value from
|
Store this value to SI 143
|
|
1 MI
|
10 (in this case, store the MI address in SI 144)
|
|
SI 144
|
4 (in this case, the value in SI 144 sets the representation mode).
|
|
|
SI 140
|
Command number:#9481
|
Reset Net Min/Max Values, Command #9226
Resets the Net Minimum value to positive full-scale, and the Net Maximum value to negative full-scale.
As soon as the scale becomes stable, meaning that the In-motion indication is OFF, the Net Min and Max values will be set to the net value.
A Net Min and Max reset occurs also at power-up.
Command parameters
|
SI 141
|
Determines the Loadcell number, and the DIN rail location of the module. Four digits are stored in SI 141.
|
LC #
|
DIN Location
|
|
0-2
|
Always 0
|
0-7
|
|
|
SI 142
|
MI address; this MI will contain the Command Status indication
|
|
SI 140
|
Command number:#9226
|
Related topics
Loadcell
Loadcell Hardware Configuration
Calibration
Tare & Zero
Loadcell Setup
Input Range
Change Excitation Mode
'Long' Integer functions