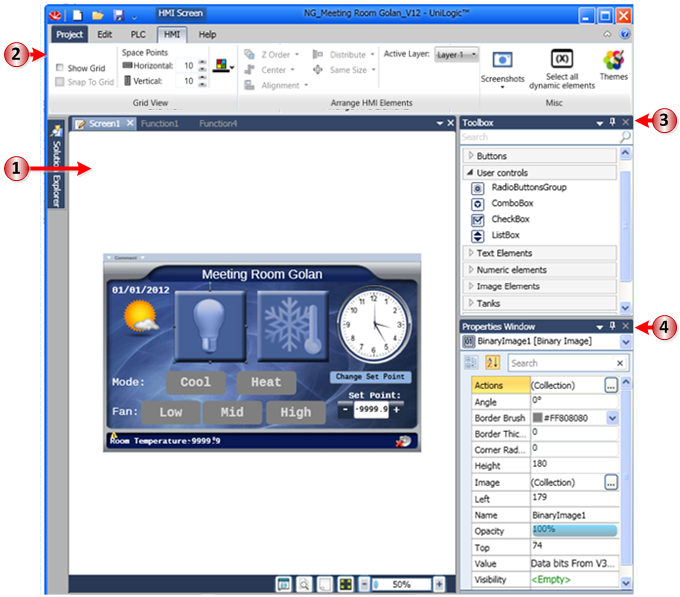
You use the HMI Display Editor to create your HMI screens and application.
|
1 |
HMI Editor |
This is where you create HMI displays. |
|
2 |
Ribbon |
The HMI tab enables you to arrange elements, export screenshots of your screens, and select themes. |
|
3 |
Toolbox (Ctr+T) |
All HMI elements are contained here. |
|
4 |
Properties Window |
The Properties change according to the HMI element you have currently selected. |
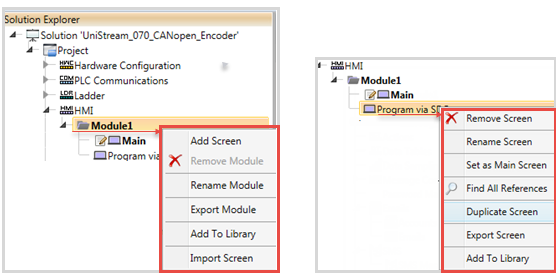
Creating/Adding HMI Display Screens
You can right-click an HMI module and select Add Screen, import a screen, or add all of the screens in the module to the Library.
Right-clicking a screen enables you to duplicate the screen, export it, and add it to the Library.
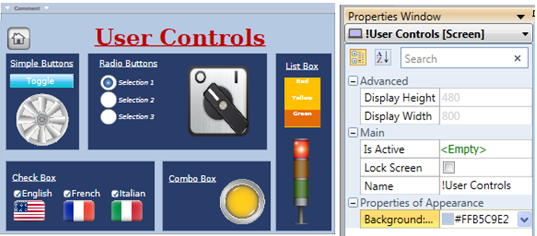
The Display properties are shown in the Properties Window when you first enter a Display, or at any time when you click an empty area.
|
HMI Properties |
|||
|
Display Height/Width |
These values are read-only, and reflect the size of the controller screen selected in Hardware Configuration. |
||
|
Is Active |
Click to assign a bit tag that turns ON when this screen is being displayed. The tag remains ON until it is reset. Note that if you use this tag elsewhere in your program, and write to it, the bit status may not reflect the Is Active Status of the screen. You can right-click the tag, and select Find to locate all instances where it is used. |
||
|
Lock Screen |
Check this to prevent the elements on the screen from being moved. |
||
|
Name |
Assign a name to identify the screen in your program. |
||
|
You can select Show Hourglass to display an hourglass during a screen jump. |
|||
|
Background: Color\Image |
|
||
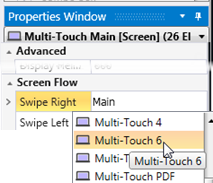
Multi-touch screens - Additional Properties
Projects based on multi-touch displays offer additional HMI properties for screen navigation.
If your project is based on a multi-touch screen model, you can select the screens users can load, by swiping left or right.
Finding and placing HMI elements
Via Keyboard
Begin typing the element name into the Search field; the list narrows as you type.
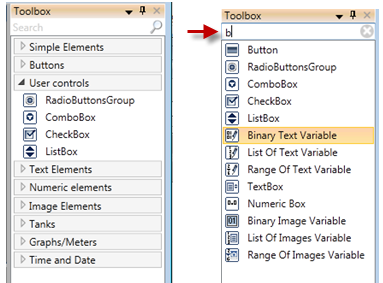
Use your keyboard's Down arrow to scroll down the list.
To insert the element either:
- Press Enter or double-click it to place it on the screen
or
- Use your mouse to drag-and-drop the element to the desired location.
Via Mouse
Navigate through categorized list using your mouse.
Drag-and-drop the element to the desired location.
Note that when you rotate elements, they snap to angles of 90/180°. To rotate without snapping, first hold down the Alt button on your keypad, then click and begin the rotation.
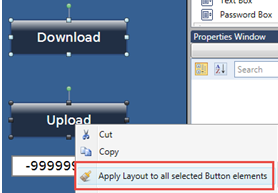
Layout refers to certain HMI element properties such as font, font alignment, and color. On a display, you can select multiple elements of the same type, then right-click to apply the layout.
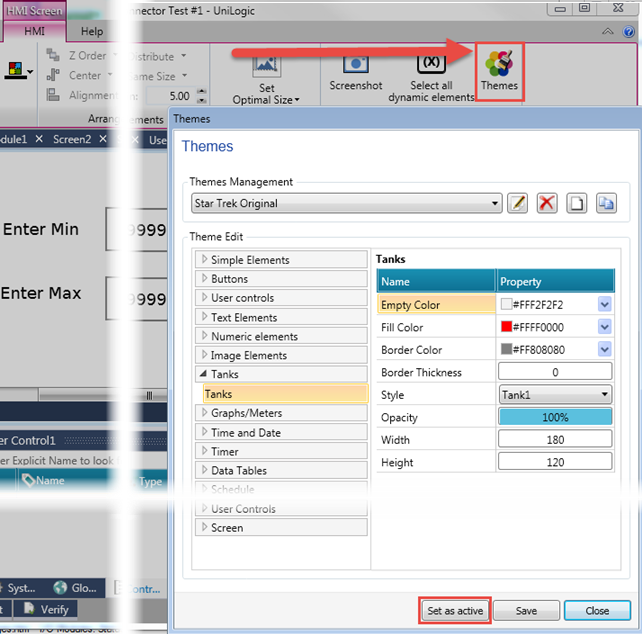
Select Themes on the HMI tab to define the appearance of elements as they appear on HMI screens. After you have customized the appearance of elements, click Set as Active to apply the Theme to future elements.
Note that selecting a theme does not affect elements that you have already placed on your HMI screens.
Selecting System Theme restores system defaults.
Note that you can also convert your existing HMI Screens to Web Pages.
HMI/Web, Copy & Paste between Projects
UniLogic automatically creates any Structs or tags supporting the elements.

