Keypad Entry Variables enable a user to enter values via the Vision keypad.
In order to enable the user to enter values, the variable must be active.
When a variable is active, pressing Enter 'locks' the variable, and writes whatever value has been entered from the keypad into the variable. The next variable becomes active.
Variable Tab Order enables you to determine the order in which Keypad Entry Variables will be activated, regardless of their location on the LCD screen.
|
Note ♦ |
If Variable Tab order is not set, when the application is downloaded the variables will be activated in the order in which they were created. This may create the false impression that the variables are being activated 'randomly'. |
Clicking the Variable Tab Order button displays all of the keypad entry variables in a Display.

When a Display contains more than 1 variable, using the right arrow key enables the user to tab from one active variable to the next. Pressing Enter 'locks' the variable, excluding it from the tab order.
A Display with Keypad Entry Variables may be in one of two states:
Active
The variables are active, marked by a blinking cursor. A Display loads into this state by default; the first variable, as set in Variable Tab Order, will be active.
System Status
|
# |
Description |
Value |
|
SB 30 |
HMI keypad entries completed |
OFF |
|
SB 32 |
HMI keypad entry in progress |
ON |
|
SI 250 |
Currently active keypad entry |
Number of currently active variable |
Locked
When variables are locked, no cursor is present on the LCD.
System Status
|
# |
Description |
Value |
|
SB 30 |
HMI keypad entries completed |
ON |
|
SB 32 |
HMI keypad entry in progress |
OFF |
|
SI 250 |
Currently active keypad entry |
-1 |
You can load all Displays in a project in the locked state via SB 27, Disable all keypad automation. If SB 27 is ON when a Display is shown, the user cannot navigate through the variable using the keypad keys and no cursor is present on-screen.. V280 users may, in order to enable variables to be activated only through 'touch', turn SB 27 ON as a power-up task.
|
Note ♦ |
When V290 is selected in Hardware Configuration, SB 27 is ON by default. When SB 27 is ON, no cursor is present on-screen. This enables the V290 user to activate any Keypad Entry Variable by touching it. |
You can also load a specific Display with all variables locked via SB 30, by building a net as shown below. Note that SB 30 should not be used to lock variables after a Display has been loaded.

After a Display loads, you can enable the user to skip keying in data for all of the variables on-screen, by turning SB 29 ON after data is keyed into any variable. When a specific Display is on-screen, turning SB 29 ON, locks all of the remaining variables.

|
Notes ♦ |
Regardless of the variable tab order, the user can activate variables by:
These methods can also activate 'locked" variables, in which values have already been entered, or that have been locked via SBs 27, 29, or 30. |
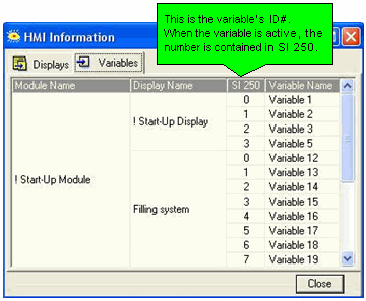
To see the variable ID numbers, open HMI Information from the View menu and click the Variables tab.

There are 2 types of Vision touch-screen models:
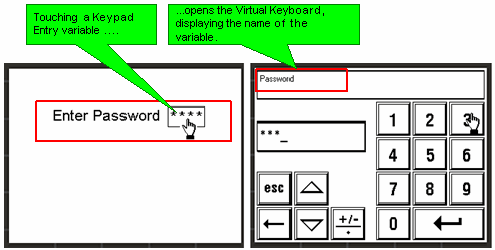
Models which comprise only a virtual keypad (V290). In these models, the virtual keypad opens whenever the user touches a keypad entry variable that is currently displayed on the screen.
Models which comprise both an HMI function keypad and a virtual keypad (V280). However, in these models, the virtual keypad must be activated by turning SB 22 Enable Virtual Keypad ON (Note: SB22 is relevant only to Standard Vision + Touchscreen, not Enhanced) This must be done at power-up, or before the Display containing the keypad variable is entered. In addition, the Keypad entry variable must be assigned a Touch Property.
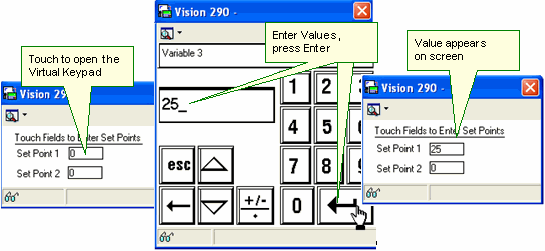
After a keypad entry variable is touched on the screen, the keyboard is automatically displayed, enabling the value to be entered. Note that you can set a font for variable display in Font Handler.

|
Note ♦ |
When an HMI keypad entry variable is active, and the Enter key is pressed on the controller keypad, SB 30 HMI Keypad Entries Completed turns ON. This can be used as a Jump condition. |
|
♦ |
SB 250, Keypad Entry within Limits, turns ON when a legal value is entered; SB 251, Keypad entry exceeds limits, turns ON when a value is out of range. You can use the status of these bits, for example, to provide a jump condition to another Display. When either of these SBs turns ON, the index number of the active variable is stored in SI 249. |
Certain SBs are only relevant to certain controller models, those with touch screens and those without. Note that the V280 contains both touch-screen and keypad.
|
Note that the V280 keyboard is enabled by default. The information here is relevant when keypad entry variables are not assigned touch properties. |
Which variable is active? Models with keypads In these controllers, a blinking cursor marks the active keypad entry variable. This cursor indicates that the user can begin to enter a value via keypad. The user navigates through the variables by using the directional arrows on the keypad.
|
Controlling the cursor via SBs |
|
|
SB 30 HMI keypad entries complete
|
|
|
SB 31 Refresh current LCD screen display variables
|
|
|
SB 29 Current keypad entry sets SB 30
|
|
|
SB 76 Keypad Entry: Focus (V130 only) If SB 76 is OFF after Keypad Entry, the user must use the arrow keys to move to the next variable. Turning SB 76 on causes the next variable set in Variable Tab Order to automatically become active. |
|
|
|
Touch-screen only ( V290) The V290 does not have a physical keypad. When V290 is selected in Hardware Configuration, keypad entry variables must be assigned a Touch property. Then, when a keypad entry variable is touched, a virtual keypad is displayed on screen. Note that in a display that contains keypad entry variables, the variables are not marked by a blinking cursor. The programmer must include a clue to inform the user as to what part of the screen must be touched. In V290, SB 22 Enable Virtual Keypad, and SB 27 Enter Display without active Keypad Entry Variables are ON by default. |

|
|
Touch-screen and keypad (V280) Physical Keypad mode Physical Keypad mode + Touch Physical Keypad mode + Touch + 'No Cursor" Virtual Keypad (V290) mode |