Click to enable OPC UA in the Solution Explorer>PLC Communications>Protocols>OPC-UA; UniLogic enables OPC UA and adds a general struct and a Diagnostic struct.

UniStream PLCs support OPC UA as a server.
Click to enable OPC UA in the Solution Explorer>PLC Communications>Protocols>OPC-UA; UniLogic enables OPC UA and adds a general struct and a Diagnostic struct.
In the Solution Explorer, note four new items under OPC-UA: Server Settings, Users, Address Space, and HotRunner Address.
Server Settings
|
Settings |
The setting shown below are the default settings. You may edit these except for End Point; this is automatically generated by UniLogic. The End Point is the identifier the client will use to identify the server; you can copy and paste the identifier into your client.
|
|
Authentication |
Select the required authentication mode. Your selection will affect the access control options in the Address Space.
|
|
Security Policies |
All of the Security Policies are checked by default.
|
|
Certificate |
By Default, the Certificate is auto-generated; uncheck the option if you wish to import a certificate. Note that the RTC in the PLC must be set correctly in order to correctly implement the Certificate Validity.
|
This is where you define the list of authorized Users and assign each user to one of two pre-defined access groups: Admin or User.
Each user entry includes a Name, Password, and Group assignment. Usernames must be unique. Every defined user must belong to either the Admin group or the User group.
Group membership determines access privileges when using the Admin Group Read/Write option in the Address Space. Users assigned to the Admin group can write to such tags, while all other users will have read-only access.
You can add, edit, or delete users using the user management table provided in this section. Note that at least one user should be assigned to the Admin group to ensure administrative access is available when required.

This is where you grant client access to data tags within the PLC. You add tags by clicking Add Tag in the Address Space window; under Access Levels, the available options depend on the selected Authentication mode in the Server Settings.
Access Level Options:
Anonymous
Read
Read / Write
Username / Password
Read
Read / Write
Admin Group Read / Write
Note that you can organize the tags in folders. You can also add arrays from within Structs, as well as complete structsadd arrays from within Structs, as well as complete structs.

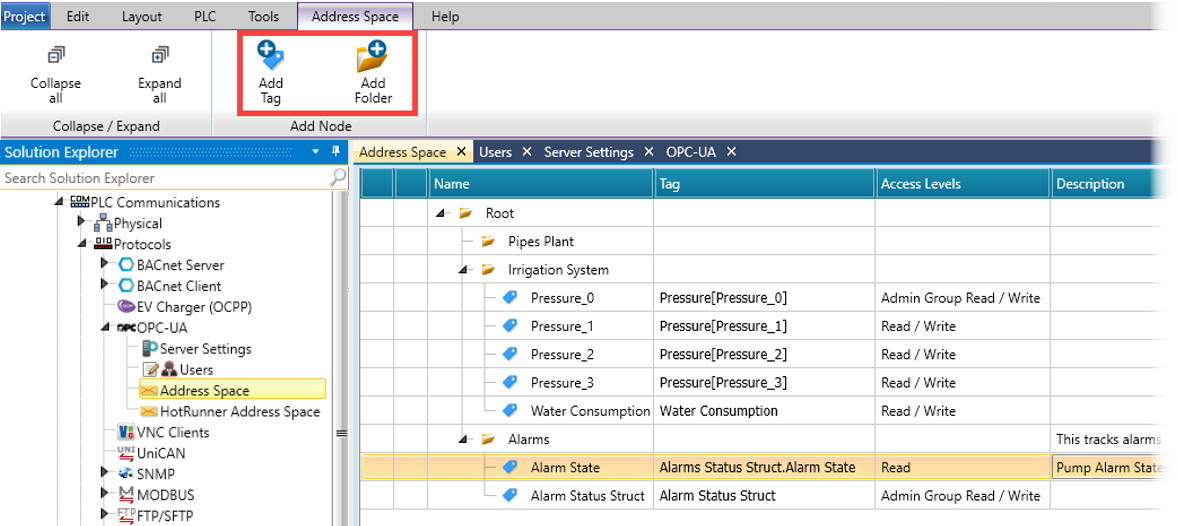
You can rearrange tags by hovering your cursor in the left column to reveal the hamburger menu, and dragging the tag to a new location.

You can right-click Address Space, and export an XML file. You can edit this file, and import it to the controller from either a DOK flash drive or an SD Card, via UniApps>Network>NEXT SCREEN>OPC UA>Import Config.

Use this space to add and configure a HotRunner system, define temperature zones, monitor and control the heating process and set temperature parameters, alarms and control modes.
 |
|
To add a HotRunner:
On the Solution Explorer tree, click OPC-UA > HotRunner Address Space, and then click Add HotRunner.

Once added, the main HotRunner object containing all operational nodes will appear under the Device Set node. It is named using the manufacturer and serial number: HRD_<MF>_<SN>.
Additionally, there is an option to automatically set the Serial Number without manual input. Instead of typing it manually, you can use one of the following formats:
HRD_<Manufacturer>_{PLC.SN}
HRD_<Manufacturer>_{PLC.NAME}
In these formats:
{PLC.SN} will be automatically replaced with the PLC's Serial Number
{PLC.NAME} will be replaced with the PLC's Hostname, which can be modified via UniApps > System > PLC Properties > PLC Name.
Note: The <Manufacturer> value must be set by the user.
Your HotRunner system is organized in a hierarchical tree structure under the Device Set:
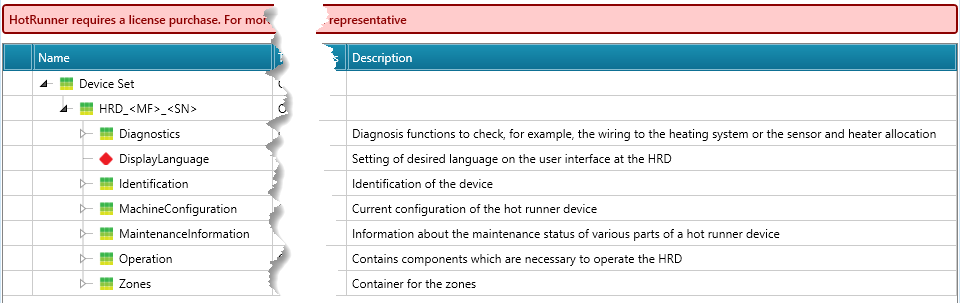
HotRunner Node Structure and component Description:
This section outlines the key elements and how they are used.
Diagnostics: Used to check system wiring and device mapping.
Display Language: Sets the language for the User Interface of the HotRunner device.
Identification: Displays metadata identifying the device.
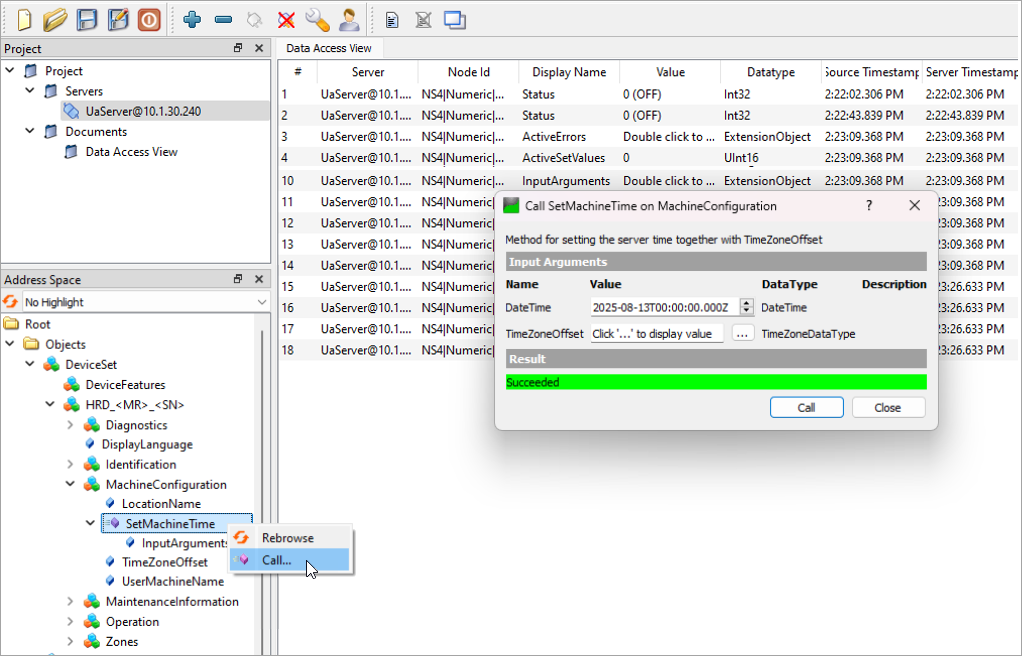
Machine Configuration: Defines the current machine setup
Maintenance Information: Provides status information for critical system components.
Operation: Provides essential controls and status indicators for runtime operation.
Zones: Each HotRunner system can define up to three Zones. Zones group the sensors, controllers, and monitoring data for a specific temperature control loop.
Mapping OPC-UA Nodes in HotRunner:
This section explains how to correctly configure and map different types of nodes in your project. Each node must be linked to a tag of the correct type, based on its role in the HotRunner interface.
|
Node Type |
Description |
Tag Type Required |
Notes |
|||
|
Object |
Logical container for other nodes |
No tag required |
Serves organizational purpose only |
|||
|
Variable |
Holds a value which can be Read or Read/Write |
Match data type (BIT, REAL, INT32, etc.) |
Required for all mandatory and optional fields |
|||
|
Method |
Performs an action when called. |
Requires a Start variable to trigger and a Finished variable to confirm completion |
Method nodes must be manually triggered via tag assignment. |
|||
|
Folder |
Sub-container used for grouping related nodes |
No tag required |
Used for clarity |
|||
|
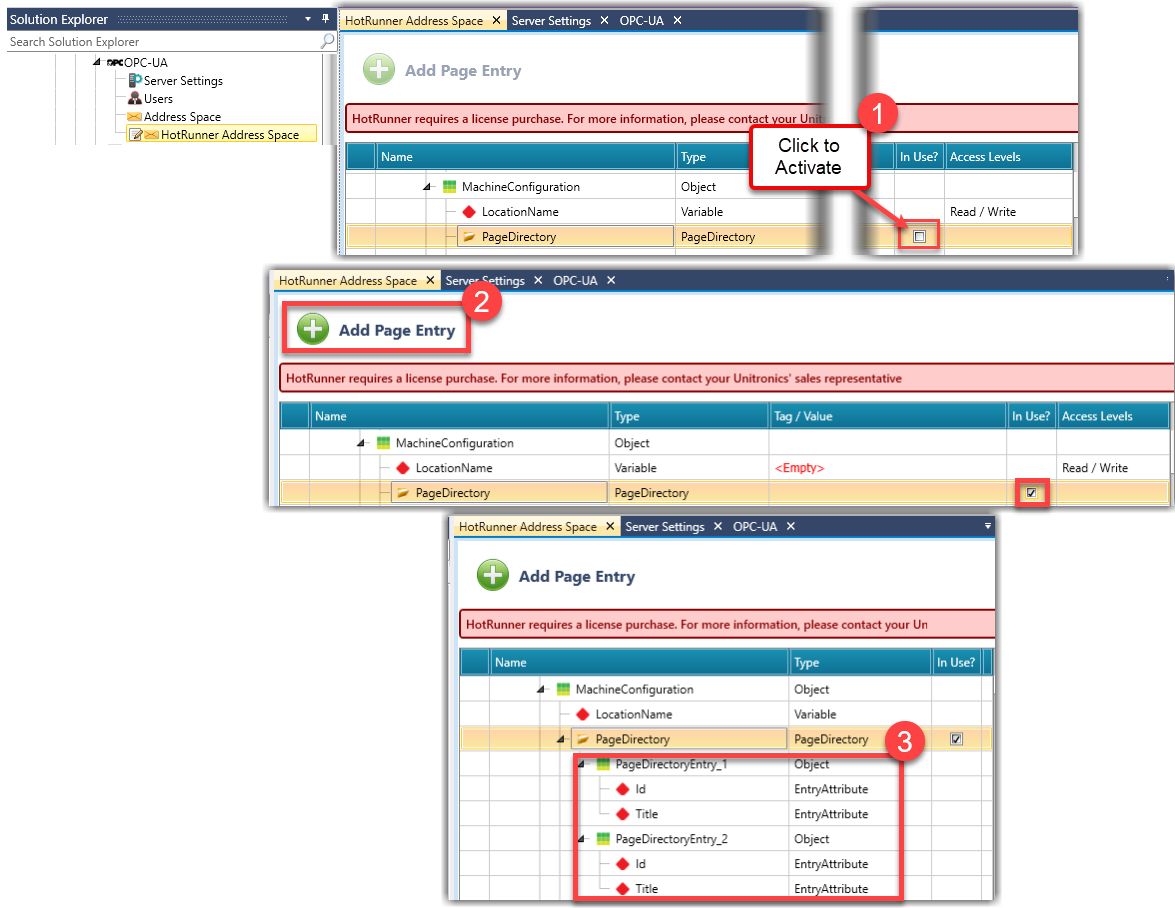
PageDirectory |
Special node for interface page listings |
No tag required |
Use checkbox to activate, then click Add Page Entry to add up to 8 PageDirectoryEntries comprised of up to 8 main objects, an Id EntryAttribute, and a Title EntryAttribute Click here to see an exampleClick here to see an example
|
|||
|
MultiStateValueDiscrete |
Represents discrete state with string labels |
UINT16 |
Used for values like mode selection |
|||
|
AnalogItem |
Represents numerical values with engineering units |
REAL |
Used for continuous values like temperature, output, etc. |
|||
|
EnumValues |
Represents a predefined struct of values |
No tag required |
Click Add Enum Value to add up to 8 values |
|||
|
TimeMethodPIDParameters |
Composite structure for PID tuning values |
No tag required |
Use the checkbox to activate, then click Add Time Method PID Parameter to map struct with four REAL tags Click here to see an exampleClick here to see an example
|
|||
Method nodes require multiple tag assignments to operate:
Map the SetMachineTime Method
In the HotRunner tree, expand Machine Configuration.

Click to expand SetMachineTime Method.

Create bit tags to control and monitor the method execution and map them to the Method Start and Method Finished variables.
Assign a SetMachineTime Struct for the InputArguments parameters.

Download your project.
Set the Start tag to ON.
Monitor the Finished tag to turn ON, indicating the method has completed.
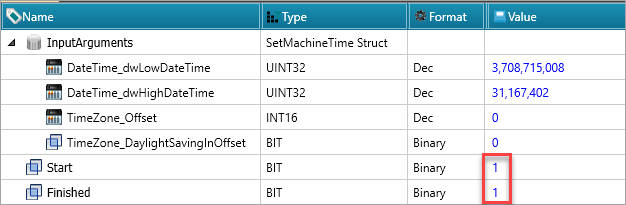
Reset the Start tag to OFF after completion.
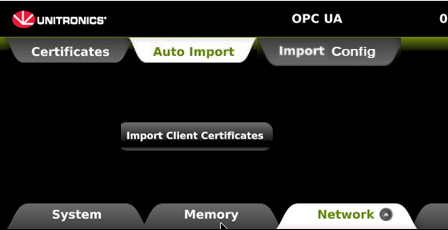
After you download the project to the controller, enter UniApps>Network>NEXT SCREEN>OPC UA.

The certificate that was generated in UniLogic will be visible on the right side of the screen, under Rejected.
Select the certificate
Press the Import icon; UniStream Move opens.
Press OK to move it to the left side, Trusted.
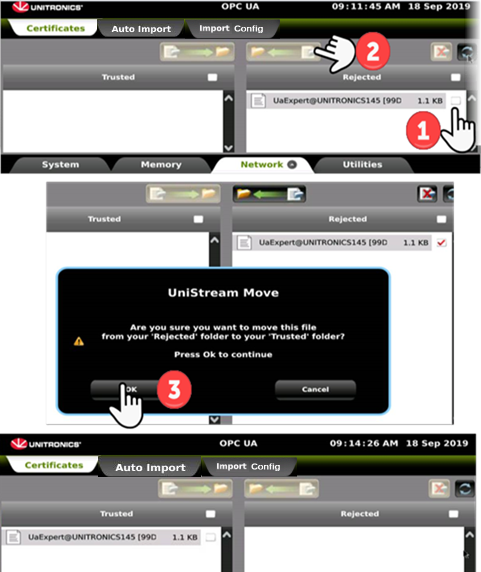
After this procedure, an OPC client will be able to access the UniStream server.

Auto-import Client Certificates
Via UniApps, you can import client certificates.