REST API
A UniStream controller can operate as a REST API client and can request specific data from a server. In order to communicate with an API REST server, you build a request, comprising:
-
Query Parameters: enter any query parameters that are required by the REST API server you are communicating with. For example, the server may request an API key, an authorization token in the server's REST API that authorizes the client request.
-
Response Parameters: this is the data that UniStream is requesting from the server; when it receives the data, UniStream parses it into tags according to the parameters you set.
-
File Parameters: enable UniStream to download files (such as compiled applications or firmware packages) from web servers, directly to an external drive (SD or USB).
Note: When downloading larger files (≥100MB), the PLC downloads the file in parts and then merges them automatically. During this process, the PLC requires double the storage (for example, a 100MB file requires 200MB free space). After the download is completed, only the original file size is used. The maximum supported file size is 400MB.
Applicable only when the Request Method is GET FILE.
 |
If you are not familiar with REST API: click here to see a breakdown of REST API structurelick here to see a breakdown of REST API structure

In UniLogic, the request is structured
as follows:
|
|
|
|
|
|
This begins with http://
and follows the structure as shown, ending with .com
/.org /.gov, etc
|
http://www.api.someExampleServer.com
|
|
|
This begins with a
backslash following the base .url, and ends with question
mark followed by the key values.
|
/currentData/v1/something?
|
|
|
The query parameters:
-
Immediately
follow the question mark at the end of the base
.url:
-
Each
requested parameter has a key name followed by
its value
-
Key
values are separated with an ampersand &
-
Key
values are usually case-sensitive
|
key1=data1&key2=data2
|
Key
|
Value
|
|
key1
|
data1
|
|
Key2
|
data2
|
|
|
|

|
-
UniStream currently supports GET, POST, PUT, DELETE, and GET FILE queries and the Authorization methods of No Authorization, Basic Authorization, OAuth 1.0, OAuth 2.0, and Custom Authorization.
|
|

|
-
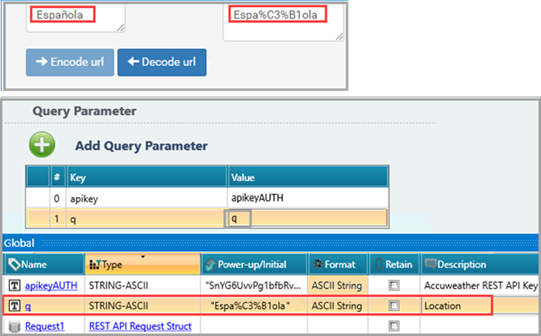
Note that REST API does not support non-ASCII characters (hardcoded/UTF16/32)
This can be an issue, for example, if you need to use non-English characters.
The solution is to use percent-encoding, also known as URL encoding, where certain characters in a URL are replaced by one or more character triplets that consist of the percent character "%" followed by two hexadecimal digits. The two hexadecimal digits of the triplet(s) represent the numeric value of the replaced character.
Click here to see an example.Click here to see an example.
This example shows the percent encoding for the word Española, which includes the Spanish tilda.
There are web utilities that can do the encoding for you; search on the web for 'url encode decode'.
|
Creating a REST API request
The example below shows how to build a JSON GET request for weather data for the city of London, using the REST API from Accuweather.
-
Select REST on the Solution Explorer, and then click Add New REST API Server.
-
Click the default server name if you wish to edit it.
-
Select the Protocol, HTTP or HTTPS; UniLogic automatically assigns the appropriate port.
Note that if you change the Port, you must open the port you wish to use in your communication settings.
-
Click in the Base URL field and enter the name of the server you want to connect to; in this example http://dataservice.accuweather.com/

-
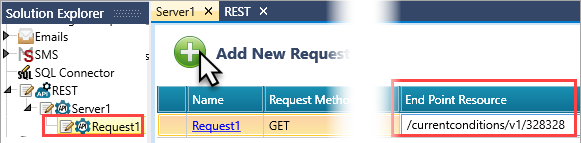
On the Solution Explorer, click the server name, then Request1, and next Add New Request; UniLogic creates the request along with a supporting Struct.
-
Rename the request (optional).
-
Click on Request Method and select GET.
Note that Content Type is only activated if you select an applicable method, such as POST.

-
Select Accept JSON.

- Click to select an Authorization method, if desired.

-
Enter the End Point Resource, in this example /currentconditions/v1/328328 (328328 is the locator for London); note that UniLogic creates a struct for your request
-
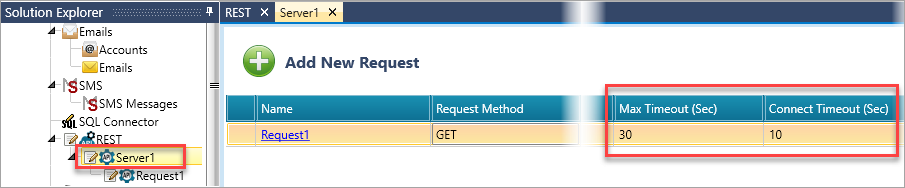
Set the Max Timeout (Sec) and Connect Timeout (Sec) to the desired values. These settings ensure that the request completes reliably under varying network conditions.
Configuring the Request
Click on the Request Method and select one of the supported methods:
Creating a GET Request
-
Click on Request Method and select GET.
-
Click on the request name; the request configuration window opens; enabling you to build the Query and Response parameters.

-
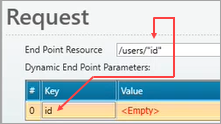
Dynamic End point parameters: if you add a dynamic variable using quotes, UniLogic displays a table enabling you to link a tag to provide the value.
-
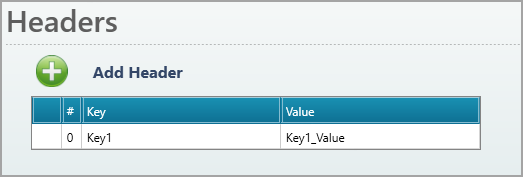
Click on Add Header, then click and enter your custom Key and Value.
-
Click on Add Query Parameter, then click:
- the Key field and enter the exact API key name, including case; in the example below note the characters are all lower-case: apikey.
- the Value field: create a tag, and enter your actual key value, shown in the example as SnYG6Uvv...GI1Q6IgG, as a Power-up Value,
then Click Save.

-
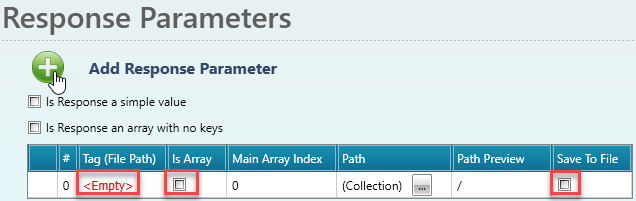
Click on Add Response Parameter, and then:
-Click the <Empty> field under Tag, and assign a Tag (File Path)
-Is Array: check this if the parameter is a member of an array
- Save to File: check this option to save the JSON content-type responses to a file on the SD card. Note that this feature only supports JSON fields containing ASCII String data. Numeric and Boolean values are not supported.
-
Click Collection and then Add New Level; add the levels as required by the server.
In this example, the request is for the temperature in degrees Celsius (metric)
Note the path preview shows the levels in the order you add them.

-
Add another Response Parameter and name it TemperatureText, then click Add New Level, enter WeatherText, and click close.

When you are done, the complete screen looks like the next image.

-
Note that you can also select a response array with no keys; in this case you link tags containing the values you require.
Use the Main Array Index numbers on the right to assign the index numbers that will set the order of the elements in your array.

Creating a GET FILE Request
-
Click on Request Method and select GET FILE.
-
Click on the request name; the request configuration window opens; enabling you to configure the File Parameters for downloading files from a web server and saving them to an SD card or USB drive.
Note that when downloading larger files (≥100MB), the PLC downloads the file in parts and then merges them automatically. During this process, the PLC requires double the storage (for example, a 100MB file requires 200MB free space). After the download is completed, only the original file size is used. The maximum supported file size is 400MB.

-
Configure the File Parameters:
-Click the <Empty> field, and assign a Tag (File Path).
-Target Drive: click to select the destination drive; External SD Card or DOK (USB stick).

-Max Timeout (Sec): click to select the maximum allowed duration for the download operation.

-Retries: click to select how many times the controller should retry in case of failure.

PUT and POST Requests
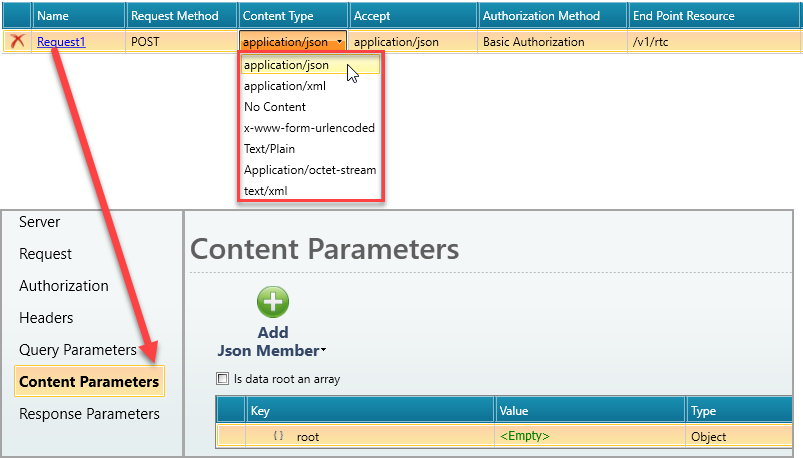
PUT and POST requests allow you to select Content Type and content. Note that you can select different Content Types; UniLogic will display only the options that are relevant to that type. The following example uses JSON.
- Click the Content Type field and select application/json, click the Request name to open it and click Content Parameters to add content.
There are different ways to add content.
- Click in the Value field and create tags.

-
Click in the Value field and make your selections; when you select a struct, UniLogic adds all the struct members. Note that you can delete individual members if desired.

-
Check 'Is data root an array' limits the content to arrays only.

-
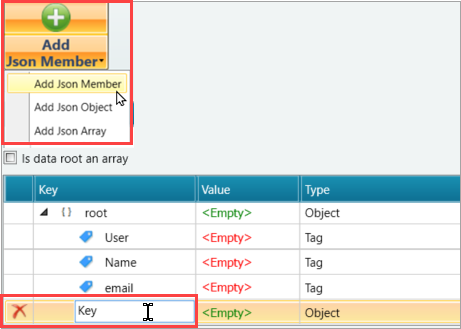
Build specific JSON content: click Add JSON Member, then edit the Key names according to your application.
Ladder: sending the REST API call
 |
The maximum number of simultaneous REST API requests is 8.
|
-
Create your trigger condition, then, from the Toolbox, place a REST API Call.
Link Input A to the Request struct.
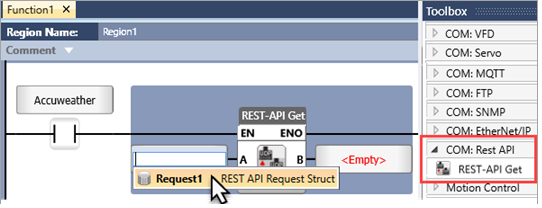
-
Link the Output to a tag to hold the status, and reset the trigger condition.
In the following image you can see the values returned from the Accuweather server.

Note that you can right-click a REST API request to remove, rename, password protect, or duplicate it.

REST API Struct values

|
|
|
|
|
Success
|
Bit
|
ON=Sent Successfully
|
|
Failed
|
Bit
|
ON=Send Failed
|
|
Service Status Code
|
UINT16
|
Error
|
Message
|
|
|
|
1
|
Invalid path to value
|
|
|
|
2
|
The tag type does not match the value type
|
|
|
|
3
|
No packet received
|
| |
|
4
|
The tag value is null
|
|
|
|
5
|
Cannot open file
|
| |
|
6
|
File path not found
|
|
|
|
200
|
OK
|
|
Service Status Report
|
STRING-ASCII
|
Generated by UniStream after Rest API call ladder function activates.
Contains internal error (1-6), or HTTP error description, or Success summary.
|
REST API Call status values
|
|
|
|
0
|
No Error
|
|
1
|
Operation accepted
|
|
2
|
Operation in progress
|
|
-1
|
Error. Check Request struct -> Service Status Code for more details
|